Thursday, 28 February 2013

Triple Chocolate Cookies


I love Chocolate, I love Cookies and I so love the cookies which has not a single, nor double but triple chocolates in them! These cookies are simply irresistible as these are soft textured cookies and perfect to dunk in a glass of cold milk or even with a cup of strong cup of coffee. These cookies go one step ahead from the delicious Chocolate Chip cookies as they have melted chocolate, cocoa powder and chocolate chips, all in one. These cookies are beautifully cracked, crunchy around the edges, soft and chewy in the middle, and full of deep, caramelized and chocolate flavor.

These cookies make a perfect option for gifting, as it would be very hard to find someone who would not love these cookies. Make these cookies once, I guarantee, you will make these cookies again.


Here's what you would need to make Triple Chocolate Chip Cookies:-

  • 226 gms (1 cup/ 2 sticks) unsalted butter, at room temperature
  • 250 gms (1¼ cup) brown sugar
  • 100 gms (½ cup) granulated white sugar/ caster sugar
  • 70 gms (2/3 cup) unsweetened cocoa powder
  • 3 large eggs, at room temperature
  • 200 gms (1 cup) melted semi sweet chocolate chips
  • 1 tsp pure vanilla extract
  • 325 gms (2½ cup) all purpose flour 
  • 1 tsp baking soda
  • ¼ tsp salt
  • ¼ tsp cinnamon powder
  • 165 gms (1 cup) semisweet chocolate chips
  • 160 gms (2/3 cup) caster sugar, for rolling
Here how you can make it:-
  • Preheat your oven to 180°C/350°F. Line two baking sheets with parchment paper/ grease with butter.
  • In a large bowl, sift flour, baking soda and cinnamon powder and mix it to come together.
  • In the bowl of your stand mixer (or with hand mixer), cream butter and sugar until light and fluffy. Sift cocoa powder and beat it until incorporated.


  • Add the eggs, one at a time, beating well after each addition. Add vanilla extract and melted chocolate and beat until well incorporated. 


  • Mix 1 to 2 tbsp of flour from your flour mixture and mix it in chocolate chips so that the chips gets completely coated in flour (this process prevents chocolate chips from sinking to the bottom of the mixture). 
  • Add the flour mixture and mix it with the rubber spatula (only if using hand mixer like me, else mix using your stand mixer). Add the chocolate chips and mix until all the ingredients starts to come together.


  • Using a small ice cream scoop, scoop out the dough to form dough balls and roll them in caster sugar kept for rolling. Place the dough balls on the baking tray lined with parchment paper keeping a gap of few inches. Flatten the cookies with by gently pressing with your hands.
  • Bake the cookies for 11 to 13 minutes depending on your oven. The cookies are done when they are set in the center. Let the cookies cool for a few minutes on the baking tray before transferring them on to wire rack to cool completely. 

Enjoy these cookies!

Hope you also enjoyed these cookies as much as I did!
Don't forget to share your experiences by way of comments here below or on FB! :)

Happy baking!

Labels: ,

Monday, 18 February 2013

Ricotta Cheesecake with Homemade Ricotta Cheese


With my first Wedding Anniversary right around the the corner, I have got all the reasons to bake this week and woo my husband. What's better than making a Cheesecake at home to celebrate a beautiful Sunday morning when all the family members are at home.

Ricotta Cheesecake
If you decide to make one, I can bet you that the Cheesecake won't last even till lunch. Everybody wanted a piece of this cake even before I made the Strawberry Sauce to go with the cake. But to show you people, how the complete Cheesecake looked like and how the Cheesecake turned so pretty with the dash of Strawberry sauce drizzle over it, I had to request them to give me another 15 minutes till they cherish the goodness of the Ricotta Cheesecake. In the 15 minutes I got, I quickly cut the strawberries, made the Strawberry Sauce and took some pictures of the cake hurriedly. I feel proud to say that more than half of the cake was gone within 5 minutes of clicking these pictures. My day was made...:)


Without talking any further, lets get straight to making Ricotta Cheesecake.

Here's what you need to make the Ricotta Cheesecake:

For the crust -
  • 100 gms/ 1 cup of graham crackers or digestive biscuits (I used Dark Chocolate Digestive Biscuits as this was available at my home)
  • 2 tbsp white sugar
  • 55 gms/ 4 tbsp melted butter
For the Cheesecake filling:


  • 227 gms/ 1 packet cream cheese, at room temperature
  • 450 gms/ 2 cups whole milk Homemade Ricotta Cheese, at room temperature
  • 200 gms/ 1 cup caster sugar
  • 1 tbsp corn flour
  • ¼ tsp salt
  • 4 large eggs, at room temperature
  • zest of 1 lemon
  • 1½ tsp pure vanilla extract
Serves - 8 to 10 people.

Here's what you need to do to make the Ricotta Cheesecake:


  • Preheat your oven to 180° C/ 350° F. Grease the sides and bottom of your 9 inch spring form pan with butter or non stick cooking spray.
  • Wrap the outside of your spring form pan with two layers of aluminium foil from the sides and bottom and keep it aside.

  • For the crust:-
    • Crush the graham cracker/ digestive biscuits in a plastic bag stammering with a  rolling pin. Place the crushed biscuits in a bowl and add sugar and melted butter and mix it all to come together. Press the biscuits mixture over the bottom of the cake pan and keep the pan in the refrigerator till you prepare the filling.


  • For the cheesecake filling:-
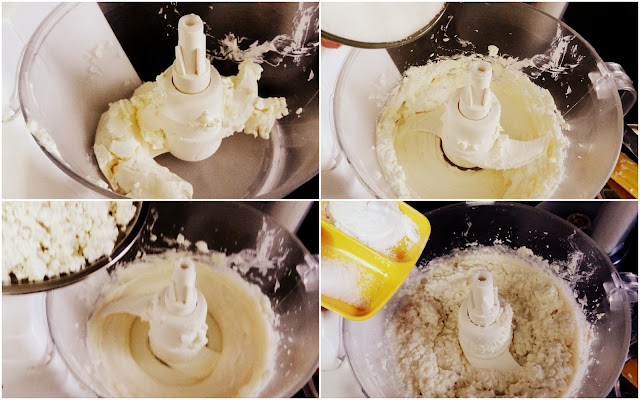
    • In the bowl of your food processor or electric stand (or hand) mixer, place the cream cheese and process it for a few seconds until smooth with no lumps. Add sugar, ricotta cheese and process it until well combined. Add in the corn starch and salt and again process it for a few seconds until smooth and combined. 
    • Add in the eggs, one at a time and process until incorporated. And finally, add in the lemon zest and vanilla and process it until all the ingredients and well incorporated. Thats it, we are done! Its as easy as that.

  • Remove the pan with the crust from the refrigerator and pour in the cheesecake filling. 
  • In a large pan, pour the boiling hot water so that the water in the large pan come halfway up to the sides of the spring form cake pan. Line the bottom of the pan with a kitchen towel. This process is known as water bath. This method is used to bake the cheesecake as the texture of cheesecake is similar to custard and its best to bake in a water bath.
  • Place the spring form cake pan in the pan and very carefully place the large pan in the oven. Mind the words "very carefully", you are dealing with the boiling hot water here and don't want to burn yourself. Bake it for about 50 to 60 minutes, or until the cheesecake is set, or yet moves slightly when the pan is shaken.
  • Remove the cake from the water bath (or it will continue to cook under hot water) and cool it completely on a wire rack. Then cover the pan and let it chill in the refrigerator for atleast 4 hours to preferably over night. 
  • This cake stays best for 3-4 days in the refrigerator, or it can be frozen. 

  • Enjoy this wonderful cheesecake with some fresh strawberries and strawberry sauce or any of the berries from the berry family for that matter.

Hope you will also enjoy baking this wonderful cake as much as I did! Don't forget to share your experience with me. I would love to see your comments!

Happy Baking!

Labels: ,

Sunday, 17 February 2013

Strawberry Sauce


Have you ever compared any dish that you make at home with the same dish you get in a restaurant? Do you feel that your dish even though tastes better than the restaurant's doesn't look that tasty? Have you ever analysed the reason why? Yeah, you guessed it right! Its all about the presentation.

Restaurant chefs use a lot of sauces, purees to make their dish look more presentable or should I say more appealing that you can't resist yourself from eating it. How about taking that extra step to make homemade dishes look more presentable, taste much better and present your dishes to your family with an edge. The good news - its very simple to do!

With strawberries still in the season, lets make some strawberry sauce and preserve it for summer when we won't get this juicy fruit.


Here's what you would need to make Strawberry Sauce:- 
  • One 500 gms pack of fresh or frozen strawberries (I used fresh strawberries)
  • 1/4 - 1/3 cup (50 - 65 gms) of sugar, or to taste
  • Freshly squeezed lemon juice (optional)
Makes - 1-1/4 cup 
Preparation time - 10 minutes


Here's how you can make Strawberry Sauce:-
  • Place the unsweetened frozen strawberries in a large bowl and thaw. This may take a few hours. Once thawed, put the strawberries and their juice in the blender. If using fresh strawberries like me, wash and cut the strawberries in pieces and place it in the blender. Process the strawberries until they are pureed. 
  • Pour the puree in a jar. First add 1/4 cup of sugar and stir until the sugar completely dissolves. Taste and add more sugar, if required. 
  • Add a little (about 1 tbsp) of lemon juice to taste.
  • Your sauce is ready.
Storage: 
You can store the sauce in refrigerator for about 1 week or this can be frozen. You can pour the sauce in an ice tray and make the ice cubes of the strawberry sauce for freezing.

This sauce works best as a filling for your cakes, cheesecakes and roulades. Or else, drizzle it over vanilla ice cream for a great flavour or fold it in some whipped cream for a fruit fool or as part of an Eton Mess. 

Hope you also would add a tad bit of sauce to your life and make it look more delightful!

Labels:

Sunday, 10 February 2013

DIY: Homemade Almond Flour


One thing about baking in India is that you don't get a lot of base ingredients for most of the recipes. This leaves you with no option but to make the base ingredient all by yourself. However, once you make the base ingredient, you realise how easy it is to Do It Yourself (DIY). Not to mention its so much lighter on your pocket and also in its purest form.

I searched for almond flour at all the places I could from the next door grocery store to the local baking supplier to the best super market; but could not find it. Considering the kinda person I am, if I gotta do something, I will find a way to do it. I couldn't find the ready made almond flour to make the French Macarons. I decided to make my own. 

Whenever I want any help in the kitchen, the first thing I do is to call my mom and ask her how to go about doing it. And there it was, the recipe to Almond Flour at home and I couldn't imagine it would be so simple.

And all you need is plain raw almonds with the skin on. Do not use almonds which are roasted or fried or salted.

Here's how you can make Homemade Almond Flour:-


Step 1 - Blanching of almonds:-
  • Put almonds in a microwave safe bowl. 
  • Add water to the bowl so that almonds are completely immersed in water. 
  • Place the bowl in the microwave for 5-8 minutes. 
  • Take the bowl out of microwave, rinse the hot water and run the almonds under cold water in order to stop further heating. 
  • Drain and put them on a flat surface.
Step 2:- Take off the skin
  • Once the almonds have been drained and rinsed, you can see the skin of almonds beginning to shrivel.
  • Take off the skin of the almonds by placing the almond between thumb and index finger. Gently apply the pressure between the thumb and finger and the skin will begin to pull away. 
  • This process does not take time; you can peel off the skin of one bowl of almond in less than 5 minutes.
  • Let the almonds completely dry on a kitchen towel.
Step 3:- Grind the almonds to flour
  • Once the almonds dry completely, grind them in a grinder until it becomes a medium fine textured flour. Don't grind it too much else you will get almond butter. 
  • Sift the almond flour through a fine flour sifter. In case any big pieces are still left, you can grind again and sift it. So now, you are ready to use this almond flour.
  • Refrigerate the flour if not using immediately. It is best to use the flour within 2 weeks of making.

    Your almond flour is ready for use.

Labels: , ,

How to Temper Chocolate


Melted Chocolate...
Woooowwww...
The word is enough to make your mouth water and bring out the child in you. This is the one single thing which can bring smile on children, teens, adults or even the elderly. The one reason I understand for this universal appeal of chocolate is that it melts at very low temperature (30° C - 32° C), which is very close to human's body temperature.

Being a home baker, there would be several occasions when you would need to temper (i.e. melt the chocolate) the chocolate to make chocolate ganache, chocolate brownies or even making chocolates.

There are two ways to temper the chocolate:-

1, Using a double boiler
2. Using a microwave

Here's how you can temper the chocolate using either of the ways depending on what suits you:

Double Boiler Method:


1. Place a saucepan, half filled with water, over gas until the water starts to boil. 
2. Keep the cut pieces of chocolate in a bowl. 
3. Make sure the bottom of the bowl does not touch the water, but creates a seal with the bottom of the pan to trap the steam produced by the simmering water. 
4. Turn the heat to low so that the boil becomes a slow simmer.
5. Continue stirring the chocolate until the chocolate completely melts.

Microwave method:


This microwave method is the easiest method for me. Its quick, its easy without the risk of burning, doesn't require too many utensils to clean up later (a big plus for me). I have a 3-2-1 step which works well for me all the time I temper chocolate in microwave. 

1. Place the chocolate (at room temperature) in small chunks in a microwave safe bowl. Plastic or glass bowl, both work well.
2. Place the bowl in the microwave for 30 seconds.
3. After 30 seconds, take the bowl out and stir. Stirring helps in distributing the heat evenly, so it melts evenly.
4. Place the bowl back in microwave for 20 seconds. Take out and stir again.
5. Place the bowl in microwave again for 10 seconds. Take out and stir.
6. By step 5, you will find the chocolate is melted completely. If not, repeat step 5 until the chocolate is completely melted and running.

So, now you are ready to use your chocolate for making several things. Use this for making chocolates, chocolate ganache, drizzling the chocolate over cookies or cakes.

Happy Baking!

Labels: ,

DIY: Homemade Ricotta Cheese


When it comes to baking, I always try to experiment with new recipes and with exotic ingredients. One among them is Cheesecake. On my random visit to Godrej Nature's Basket, I picked up a packet of Ricotta Cheese. I was looking for recipes to use this Ricotta Cheese and a perfect time to make it. It took more than couple of weeks as some renovation work was going on at home and all I could see around was a mess, including me. Coming back to my cheesy affair, when I actually opened the can of ricotta cheese after 2 weeks, it was spoilt by then. Yes...ricotta cheese is highly perishable.

With a broken heart (the cheese had cost a bomb!) and desire to make a Cheesecake, I decided to go easy on my pocket and make the Ricotta Cheese at home.

Homemade Ricotta Cheese

Making Ricotta Cheese at home is very easy, the ingredients would always be available at home. Ricotta Cheese can be used for making Cheesecakes, lasagna or as a side serving with sliced fruits along with a drizzle of honey.

Recipe adapted from simplyrecipes.

Here's what you need to make Homemade Ricotta Cheese:
  • 2 quarts whole milk
  • 1 cup plain whole milk yogurt (you can use low fat yogurt)
  • ½ cup heavy cream (optional)
  • 2 tsp white vinegar
  • 1 tsp salt

Here's how you can make Homemade Ricotta Cheese:


  • Add the ingredients in a large sauce pan. Put the pan on a medium flame until the milk curdles. This would not take more than 5 minutes.
  • In the meanwhile, line a of cheesecloth on a strainer and keep the strainer over a deep bowl/ jug. 
  • Pour the milk mixture through the strainer and let it drain for 15 minutes. Gather the cheesecloth around the curd and squeeze gently to drain the excess liquid.
  • Use the ricotta cheese when it is slightly warm or you can refrigerate for 2-3 days.
  • You can even use the whey (the liquid from the cheese) for preparing dough for chapatis (Indian Flat breads). The whey is rich in proteins and minerals.
Yield - 2 cups

Labels: , ,

Tuesday, 5 February 2013

French Macarons


Here I am, after a break for a long time... almost couple of months. I have been coping up with some health issues, traveling and engaged in refurnishing of house. With everything done now, I am back with full energy, enthusiasm, a newly furnished house and loads of recipes to share with you all. All this while, even though I was not writing I did a lot of baking and just can't wait to share with you all the different things that I have tried my hands at. One of the various things I tried for the first time in these past couple of months is French Macarons. Yes... maiden attempt and fairly succeeded!

Making perfect French Macarons is the dream of every baker. I started, keeping my fingers crossed, hoping to make my first Macs perfect.

My First French Macarons

These are the best cookies to have with some of your favourite frosting (the filling in the macarons) for those moments of perfect indulgence. Here, I have tried dark chocolate ganache, white chocolate ganache and nutella frosting. Other great options to frost these cute little macarons are swiss buttercream, lemon curd, dulce de leche, jam of any of your favourite flavour-starwberry, raspberry, orange and the list just goes on....


I know these pictures are enough of temptations and now you would also like to try it out by yourself...... so what are we waiting for? Lets get to the work...

Here's what you would need to make french Macarons:- 


All the ingredients here are given by weights. It is important for a successful macarons to have all the ingredients measured with a digital weighing scale. Believe me, this investment would be worth every single penny.

100 gms of almond flour (click here to know How to make Homemade almond flour)
180 gms icing sugar
100 gms egg whites at room temperature
1/4 tsp cream of tartar (optional)
35 gms superfine sugar/ castor sugar

Output: 30 macarons

Here's how you can make the perfect French Macarons:-

1. Line 3 baking sheets with parchment paper and draw a template of 15 circles (3X5) of 1.5 inches or 3 cm in diameter each on parchment paper the size of your baking sheet.
2. Sift together icing sugar and almond flour in a medium size bowl and keep it aside.


2. In another clean and dry bowl, add egg whites and cream of tartar (optional) and beat with your hand beater or stand mixer using whisk attachment until foamy. 
3. Gradually add caster sugar in the egg white mixture while beating it. 
4. Once all the sugar goes into the egg whites, beat the egg whites for 3-4 minutes until you get stiff straight peaks. Care should be taken not to over beat the egg whites. Keep checking for the stiff peaks and stop once u get the straight peaks like shown in the picture above.


5. Add the dry ingredients i.e. mixture of almond flour and icing sugar into egg white mixture in 3 additions. Mix the dry ingredients well after each addition. Do not worry if the air incorporated in egg whites is vanishing, you want some of the air to go off the egg whites. At the end, you will get a paste like mixture smiling back at you with a gloss. And yeah..... you are done!


6. Time to tint the batter with you favourite food colour. I divided my batter into 3 parts and coloured them blue, yellow and pink respectively. This step is absolutely optional. Add the food colour drop by drop and see if you are happy with the colour. You simply need to follow your instincts for this step. Cool.. ..isn't it?

7. Pour each of these different coloured batter into three disposable piping bag or ziplock bag and snip off the end of the bag. Put the template below the parchment paper on your baking sheet and pour the batter into the circles drawn on template. Try to pour the batter within the circle as the batter has some tendency to spread. 

8. Remove all the air bubbles from the batter by either tapping the baking tray or break the bubbles with the help of tooth pick. Let the macarons sit in the baking tray sit for 30 - 60 minutes. In the meanwhile, pre heat your oven to 160° C/ 325° F. Bake the macarons for 14 - 16 minutes, rotating the sheet front to back about halfway through the baking.

9. The macarons are done when you can barely remove the macarons from the baking tray. There will be a little browning on the corners of the macarons. If you see the bottom of the macarons brown too much, you can line baking tray with sheets of two parchment papers.

10. Remove the macarons from the oven and let it cool completely on the baking tray kept on a wire rack. 

Assembly:-
To assemble the macarons, take two similar size of macarons and sandwich them together with your favourite filling. The best choices of filing are lemon curd, chocolate ganache, swiss buttercream, nutella or jam.

While the macarons can be served the day they are made, the best of flavours come out the next day. These cookies need to mature for a day or two in the refrigerator. Serve at room temperature.
                                     
I filled my macarons with dark chocolate ganache, white cocolate ganache and nutella. Everybody simply loved it.


Hope you also making macarons as much as I did! Don't forget to share your experience with me, leave your comments in the comment box below. I would love to hear back from you all.

Happy Baking!

Labels: