Friday, 29 March 2013

Cocoa Delight Brownies

It was the time when I was going home, as in my mother's home. Sometimes, I feel sad when people tell me that after marriage my mother's home is not my home anymore. But, how could I just stop saying or believing that home, where I lived so long, where I took my first breath, my first steps, spoke my first words, made my first friends and the place that gave me comfort for more than 21 years of my life when I knew nothing would go wrong as long as I am here. I certainly believe in calling my hubby's home "my home" as I am making this home with tender love and care for the people who will be there with me for the rest of my life. But still, my mother's home will always be my first home. 

I know it became too sentimental, this topic is very touchy for every Indian girl I think, who loves her family.


Okay, so when I was going to my 'first home', I got a last minute request from my younger brothers to bring some of my delights, especially brownies, as both of them are die hard chocoholics. I just had a couple of hours and had to pack my bags (yeah, I do everything at the last minute!!!) and make some brownies before I left to catch the train.


The recipe I chose to make was very simple and was so quick that I was bang on time with my hot brownies and my packed bags to leave. These brownies do not need tempered chocolate as the flavour comes from cocoa powder. Yet the taste of the brownies is dense chocolate-y and soft. I even need not wait for the butter to come to the room temperature as the butter needs to be melted which just took a minute and a half in the microwave and it was all it took to proceed with the recipe immediately. These were so yummy that all of these brownies were finished in less than 3 days. :)


Please spare me for the poor quality of the photos here as the pics were taken at night and in great hurry.


Brownie Recipe adapted from Hershey’s

Makes: About 18 brownies.

Here's what you would need to make Cocoa Delight Brownies:

1 cup/ 226 gms (2 sticks) butter
2 cups/ 400 gms sugar
2 teaspoons vanilla extract
4 eggs
3/4 cup/ 75 gms HERSHEY’S Cocoa Powder
1 cup/ 130 gms all-purpose flour
1/2 teaspoon baking powder
1/4 teaspoon salt
1 cup chopped walnuts (optional but I recommend)

Here's how you can make it:
Heat oven to 350°F. Grease a 13x9x3-inch baking pan with butter or line it with a parchment paper leaving some extra paper from the sides so that its easy to take out the brownies when they are done.
  • Place butter in large microwave-safe bowl. Microwave at HIGH for 2 to 2-1/2 minutes or until melted. 
  • Stir in sugar and vanilla and whisk for 2 minutes until well blended. 
  • Add eggs, one at a time, beating well with a whisk after each addition. 
  • Add cocoa; beat until well blended. 
  • Add flour, baking powder and salt; beat well. Stir in nuts, if desired. 
  • Pour batter into the prepared pan and level the batter using an offset spatula.
  • Bake for about 30 to 35 minutes or until brownies begin to pull away from sides of pan. Cool completely in pan on wire rack. Cut into bars. 
  • I dusted snowy icing sugar over my brownies. Optionally, you can frost the brownies with chocolate ganache.
Hope you would enjoy making these brownies as much as I did!

Happy Baking!

Labels: ,

Monday, 25 March 2013

Not just a Banana Bundt Cake with Chocolate Ganache | #BundtAMonth


I am pretty excited for this particular post as this is my first participation in any group event. I have been trying for a long time to do this but something (may be fear deep inside) was pushing me back all through. But this month, I wanted to overcome my fear and wanted to just go ahead and participate in the group baking event this month. I was surfing on the internet and came to know about this month's BundtAMonth bake event and I immediately decided to be a part of it.

I love Bundt Cakes and loved the idea of baking a Bundt every month based on a theme. The theme of this month is Tropical Fruits. I was pleased when I got to know about this month's theme as I really love baking with fruits. Having already baked an Orange Marmalade Cake before, I decided to go for bananas this time and bake a Banana Bundt Cake. I love bananas in the cake as the ripened banana makes the cake very moist. I had a recipe for Banana Bundt Cake by Jamie from My Baking Addiction which I had pinned long time back on my list of 'Things to Bake'. With the tropical theme on BundtAMonth, I decided to give it a try once the bananas were perfectly ripened for the cake.


This is NOT JUST ANOTHER Banana Bundt Cake, there are many things done differently for this cake. What caught my eye is the fact that the cake is baked at a very low temperature of 135°C/275°F for about 1 hour 40 minutes! You will love the smell of the cake while it bakes in the oven and even hours after the cake is baked. The cake is then transferred to the freezer for a good one hour as soon as it is brought out of the oven. This is not something you do for other cakes. Do you??? To top it all, the cake gets a frosting with chocolate ganache to go with bananas for a combination made in heaven. All these efforts pay off when you taste the cake, so wonderfully moist and soft and full of flavour.

Without taking much of your time, lets get straight to the baking.

Here's what you would need to make Banana Bundt Cake with Chocolate Ganache:

For Banana Bundt Cake:
1½ cup ripened bananas (mashed with a fork)

2 tbsp lemon juice
3 cup/ 390 gms all-purpose flour
1½ tsp baking soda
¼ tsp salt
¾ cup/ 170 gms unsalted butter, at room temperature (ignore salt if using salted butter)
2 cup/ 400 gms granulated white sugar
3 large eggs
2 tsps pure vanilla extract
1½ cup/ 360 ml. buttermilk (refer Note Below)

For Chocolate Ganache:
125 gms dark chocolate
½ cup/ 120 ml. low fat cream (I used Amul)

Note - To make Buttermilk at home, mix 1½ tbsp lemon juice/vinegar to 1½ cups of milk and keep it untouched for 10 minutes. You have the perfect buttermilk for the recipe.

Here's how you can make it:

For Banana Bundt Cake:

Preheat you oven to 135°C/275°F. Grease a 12 cup bundt pan with some butter.

  • Mix lemon juice in mashed bananas and mix it well. Keep it aside.
  • In a bowl, sift together all purpose flour, salt and baking soda and whisk it all together.
  • In a separate large bowl (if using hand mixer like me) or in the bowl of your stand mixer using paddle attachment, beat butter and sugar until light and fluffy.
  • Add in the eggs, one at a time, beating well after each addition. Scrap down the sides of the bowl as needed. After adding all the eggs, the mixture will turn very soft, smooth and light lemon in colour.
  • Add vanilla extract and beat it all together until nice and combined.
  • Add the flour mixture (in three additions) alternatively with buttermilk (in two additions), starting and ending with flour mixture. Fold the mixture after each addition until dry ingredients are completely incorporated into the wet ingredients. 
  • Add the mashed bananas in the mixture and give it a good mix until the bananas are completely incorporated into the mixture.
  • Pour the mixture in the bundt pan and bake it for about 1 hour 40 minutes or until a tooth pick inserted in the centre of the cake comes out clean.
  • Take the cake out of the oven and keep it in the freezer (with the cake pan) for about an hour.
  • Bring the cake out of the freezer and let it cool on a wire rack for about 3 hours to overnight. Invert the cake and prepare the chocolate ganache

For Chocolate Ganache:

Melt the chocolate. Add the cream. Give it a good mix until both the ingredients are well combined. Immediately pour it over the cake. Finish it with banana slice toppings.

Hope you would also enjoy making this cake as much as I did! Don't forget to share your experiences by way of comment on the blog or on FB! I would love to hear from you guys!

Happy Baking!

Labels: ,

Monday, 11 March 2013

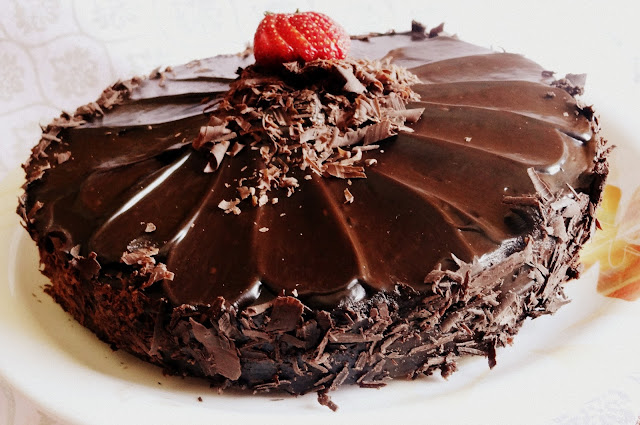
The Best Eggless Chocolate Truffle Cake Ever!!!


I love to try different cake recipes especially if the recipe does not include eggs in them. Well, for some, its hard to like an eggless cake but being from a family where not everybody eats eggs, eggless recipes are always welcome! I found one such recipe when I was browsing though the net and I immediately knew I had to give this recipe a try.

Fortunately, I did not have to wait for a long time as I had my newly wed cousin visiting me last week. I thought this was a perfect opportunity to bake him this Chocolate Cake in celebration.


I have not named this cake as Best for no reason. I have tried and tasted a lot of Eggless Chocolate Cake recipe, but this was simply amazing! So soft, so moist and so easy to make. This cake uses unsweetened cocoa powder which is so easily available anywhere and gives an intense dark flavour that satisfies any cocoa lover. This cake also uses some lemon juice which reacts with cocoa powder and gives this cake a texture like a red velvet cake.

Enough of bragging about this cake. Now, lets get straight to how you can also replicate this at your home.

Here's what you would need to make this Best Eggless Chocolate Cake:-

For Chocolate Cake:


  • 195 gms (1½ cup) all purpose flour
  • 25 gms (¼ cup) unsweetened cocoa powder (I used Cadbury's)
  • 200 gms (1 cup) caster sugar
  • 1 tsp baking powder
  • ¾ tsp baking soda
  • ¼ tsp salt
  • 75 gms (1/3 cup) vegetable oil (You can use any flavourless oil or melted butter. I used vegetable oil.)
  • 240 ml (1 cup) warm water
  • 1 tbsp freshly squeezed lemon juice
  • 1 tsp pure vanilla extract
For Chocolate Ganache Frosting:
  • 250 gms semisweet chocolate, chopped
  • 200 gms low fat cream (I used Amul Cream)
  • 2 tbsp butter
For sugar syrup
  • ¼ cup sugar
  • ¼ cup water
  • 2 tbsp dark rum (optional)
Some chocolate shavings for decoration 

Serves - 8 people

Here's how you can make it:-

Preheat your oven to 180°C/350°F. Line an 8 inch round cake pan with baking parchment paper.
  • In a large bowl, sift all purpose flour, cocoa powder, sugar, baking powder, baking soda and salt and whisk it all together.
  • Make a well in the center of your flour mixture and add warm water, lemon juice and vanilla extract and mix it all together with a rubber spatula.
  • Add vegetable oil/ melted butter and mix it until all the ingredients come together.
  • Pour the batter into your cake pan and bake it for about 30 minutes until a tooth pick inserted in the center come out clean. The cake will spring back when lightly pressed.
  • Remove from the oven and let it cool completely.
  • Once the cake is cooled completely, serve it with some icing sugar sprinkled on top of it. If you would like to frost the cake like me, keep the cake in the freezer for an hour to chill completely before you cut and frost the cake. This helps to reduce crumbs while slicing the cake.
For Chocolate Ganache Frosting:-
  • Melt chocolate and butter in microwave until completely melted. Add low fat cream and mix until the cream is completely mixed into the chocolate. Let the ganache cool to room temperature slightly.
For simple syrup:- 
  • Put water and sugar in a saucepan and let it simmer until the sugar completely dissolves. Once cooled to the room temperature, you can add dark rum (optional).
Assembling:-
  • Using a long serrated knife, cut the cake in two layers. Keep the cake right side up.
  • Soak the bottom layer of the cake with simple syrup and cover the layer with some chocolate ganache. Smooth out the surface using an offset spatula. You can also add some chocolate shaving.
  • Place the top layer of the cake on the base layer. Again, soak the top layer of the cake with simple syrup and pour a big dollop of chocolate ganache on top and sides of the cake. Smooth out the top and sides of the cake with the help of your offset spatula. 
  • Clean the offset spatula and mark the tip of your offset spatula from the edge of the cake towards the centre in one single stroke. Repeat the process to cover the entire cake.
  • Decore the sides and top of the cake with some chocolate shavings.
Hope you enjoy the cake as much as I did!
Don't forget to share your experience by way of your comments here below or on FB!

Happy Baking!

Labels: , ,